
WinSCP
WinSCP is a free Desktop Application for Windows which allows to the management of remote files for a wide variety of protocols including S3 compatible Object Storage.
Please follow the installation instruction described on WinSCP
All you will need is:
access_keysecret_key- HPK S3 URL
For access_key, secret_key, and the S3 URL please check here.
Configuration for HPK S3 compatible Object Storage
Example values
access_key= 82046e8110804a43bf29c1ae426a724dsecret_key= 82e69bd7a52076c527154297a76c2233- S3 URL = https://eu2.storage.hoster.pk
Steps
- Create a new login via
Session->New Session, possibly it shown right away and should look like the following

- Choose
Amazon S3as file protocol - Specify settings, see screenshot
- in field
Host nameputeu2.storage.hoster.pk(depending your Object Storage). NOTE: please make sure to enter withouthttps:// - in field
Access key IDput your access_key, e.g.82046e8110804a43bf29c1ae426a724d - in field
Secret access Keyput your secret_key, e.g.82e69bd7a52076c527154297a76c2233
- in field
Click on Advanced and choose Advanced. The following screen should appear
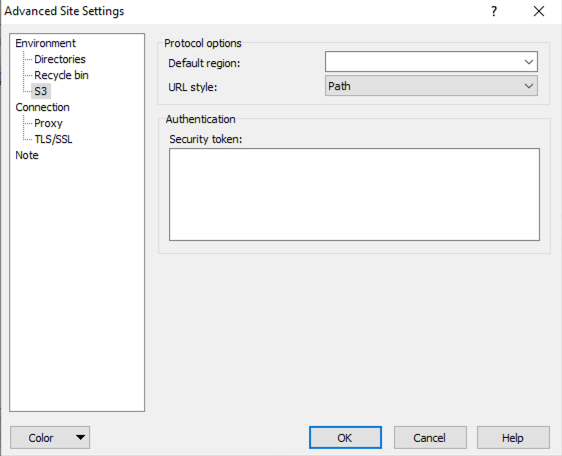
- Choose
PathasURL style - Click
OK - Click
SaveClickLoginand you are done and have access to your Object Storage - Introduction:
- Amazon S3 (Simple Storage Service) compatibility allows users to connect various applications to S3-compatible storage solutions. WinSCP, a popular Windows-based file transfer tool, can be configured to work with S3-compatible Object Storage services, providing an easy way to manage files and data.
- Step 1: Download and Install WinSCP
- Start by downloading and installing WinSCP from the official website.
- Run the installation wizard and complete the installation process.
- Step 2: Obtain S3-Compatible Object Storage Details
- Gather necessary information: Access Key ID, Secret Access Key, Endpoint URL, and Region from your S3-compatible storage provider.
- Step 3: Launch WinSCP and Create a New Site
- Open WinSCP and navigate to the "Session" panel.
- Click on "New Site" to create a new connection.
- Step 4: Configure the New Site for S3-Compatible Storage
- In the "File protocol" dropdown, select "Amazon S3" or "S3-AmazonAWS" depending on the version of WinSCP.
- Enter the obtained Endpoint URL in the "Hostname" field.
- Input your Access Key ID and Secret Access Key in the respective fields.
- Choose the appropriate Encryption settings and specify the desired S3 Region.
- Step 5: Save the Configuration and Connect
- After filling in the required details, click on "Save" to store the session configuration.
- Click on "Login" to establish a connection to the S3-compatible Object Storage.
- Step 6: Transfer Files and Manage Data
- Once connected, you can navigate and manage your S3-compatible Object Storage similar to any file system.
- Drag and drop files between your local machine and the S3 storage, create directories, and perform various file operations using WinSCP's interface.
- Conclusion:
- Configuring WinSCP to work with S3-compatible Object Storage provides a convenient method for transferring and managing files. By following these steps, users can effectively utilize WinSCP for seamless data management with their S3-compatible storage provider.
- This structure outlines the general process for configuring WinSCP for S3-compatible Object Storage. Specific details might vary depending on the particular S3-compatible service and WinSCP version you're using.
Introduction:
Amazon S3 (Simple Storage Service) compatibility allows users to connect various applications to S3-compatible storage solutions. WinSCP, a popular Windows-based file transfer tool, can be configured to work with S3-compatible Object Storage services, providing an easy way to manage files and data.
Step 1: Download and Install WinSCP
Start by downloading and installing WinSCP from the official website.
Run the installation wizard and complete the installation process.
Step 2: Obtain S3-Compatible Object Storage Details
Gather necessary information: Access Key ID, Secret Access Key, Endpoint URL, and Region from your S3-compatible storage provider.
Step 3: Launch WinSCP and Create a New Site
Open WinSCP and navigate to the "Session" panel.
Click on "New Site" to create a new connection.
Step 4: Configure the New Site for S3-Compatible Storage
In the "File protocol" dropdown, select "Amazon S3" or "S3-AmazonAWS" depending on the version of WinSCP.
Enter the obtained Endpoint URL in the "Hostname" field.
Input your Access Key ID and Secret Access Key in the respective fields.
Choose the appropriate Encryption settings and specify the desired S3 Region.
Step 5: Save the Configuration and Connect
After filling in the required details, click on "Save" to store the session configuration.
Click on "Login" to establish a connection to the S3-compatible Object Storage.
Step 6: Transfer Files and Manage Data
Once connected, you can navigate and manage your S3-compatible Object Storage similar to any file system.
Drag and drop files between your local machine and the S3 storage, create directories, and perform various file operations using WinSCP's interface.
Conclusion:
Configuring WinSCP to work with S3-compatible Object Storage provides a convenient method for transferring and managing files. By following these steps, users can effectively utilize WinSCP for seamless data management with their S3-compatible storage provider.
This structure outlines the general process for configuring WinSCP for S3-compatible Object Storage. Specific details might vary depending on the particular S3-compatible service and WinSCP version you're using.


You must be logged in to post a comment.